Hello, fellow Excel users! I’m excited to share some tips with you today on How to Customize the Ribbon in Excel.
As you know, the ribbon is a key feature of Excel that contains all the commands and tools you need to create and edit your spreadsheets.
But did you know that you can customize the ribbon to make it even more powerful and efficient?
In this article, I’ll guide you through the process of customizing the Excel ribbon, step by step.
- Introduction
- What Can and Cannot Be Customized
- How to Customize the Ribbon in Excel
- Step-by-step guide on how to access the customization options
- Creating a Custom Ribbon Tab
- Adding Your Own Ribbon Group
- Adding a Command Button to the Ribbon
- Hiding Command Labels and Showing Only Icons
- Renaming Tabs, Groups, and Commands
- Moving Tabs, Groups, and Commands
- Removing Commands, Groups, and Tabs
- Hiding and Showing Tabs
- Customizing Contextual Tabs
- Resetting Excel Ribbon to Default Settings
- Exporting and Importing Customized Ribbon
Introduction
- Explanation of what the Excel ribbon is
At its core, the ribbon is a graphical user interface (GUI) that organizes Excel’s commands and tools into a series of tabs, groups, and buttons.
You’ll find all the basic commands, such as Save and Print, on the Home tab, while more advanced commands, such as Data Analysis and Macros, are located on other tabs.

The ribbon is designed to be intuitive and easy to use, with each tab and group labeled clearly and logically. But did you know that you can customize the ribbon to suit your specific needs? By adding, removing, or rearranging tabs, groups, and commands, you can create a customized ribbon that works best for you.
In the next sections, I’ll walk you through the process of customizing the Excel ribbon step by step, so you can make the most of this powerful tool.
- Overview of why customizing the ribbon can be useful
Customizing the Excel ribbon can be a huge time-saver, as it allows you to access the commands and tools you use most frequently with just a few clicks. By customizing the ribbon to suit your workflow, you can streamline your work and boost your productivity. Additionally, customizing the ribbon can make Excel easier to use for new users, by providing a simplified interface with only the most essential commands and tools.
What Can and Cannot Be Customized
In the next section, I’ll provide a detailed overview of what you can and cannot customize on the Excel ribbon. Understanding these limitations is important when you’re creating a custom ribbon that suits your needs.
Explanation of What Elements of the Ribbon can be Customized
To enhance your productivity and streamline your workflow in Excel, you have the option to customize the ribbon by adding elements such as:
- Add new tabs, groups, and commands
- Rename or remove existing tabs, groups, and commands
- Hide or show entire tabs or individual commands within a group
- Customize contextual tabs that only appear when certain objects or commands are selected.
Discussion of Elements that Cannot be Customized
While there are many ribbon customizations available in Excel, some elements cannot be altered:
- The built-in tabs, such as Home, Insert, Page Layout, Formulas, Data, Review, and View, cannot be removed or renamed.
- The core commands, such as Save, Undo, Redo, Cut, Copy, Paste, and Print, cannot be removed, renamed, or moved.
- The Quick Access Toolbar, which is located above or below the ribbon, can be customized, but its position cannot be changed.
How to Customize the Ribbon in Excel
We are going to be going through some of the key changes you can make to the ribbon. However, we need to first get into the customization options section.
Step-by-step guide on how to access the customization options
To begin customizing the Excel ribbon, you will need to access the Customize the Ribbon window, which is located in the Excel Options menu.
There are two ways to access this menu:
- Click on the File tab, then select Options and Customize Ribbon
- Right-click anywhere on the ribbon and select Customize the Ribbon from the context menu
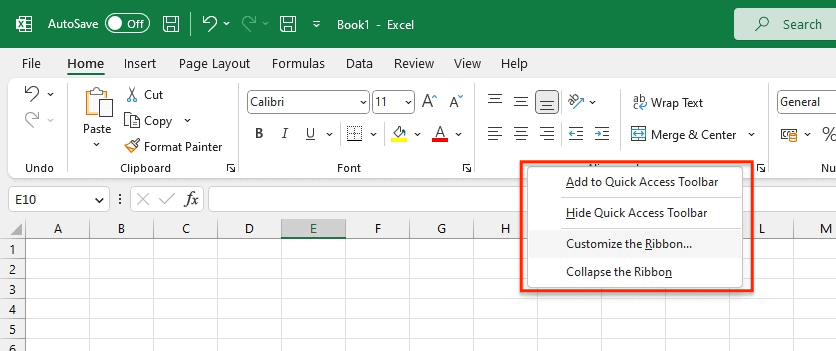
Once you are in the Customize the Ribbon window, you can begin making changes to the ribbon to better suit your needs and workflow.
Creating a Custom Ribbon Tab
In this section, I’ll provide step-by-step instructions for creating a custom ribbon tab in Excel.
- Open Excel and go to the Customize the Ribbon screen by clicking on File > Options > Customize Ribbon or right-clicking on the ribbon and selecting Customize the Ribbon.
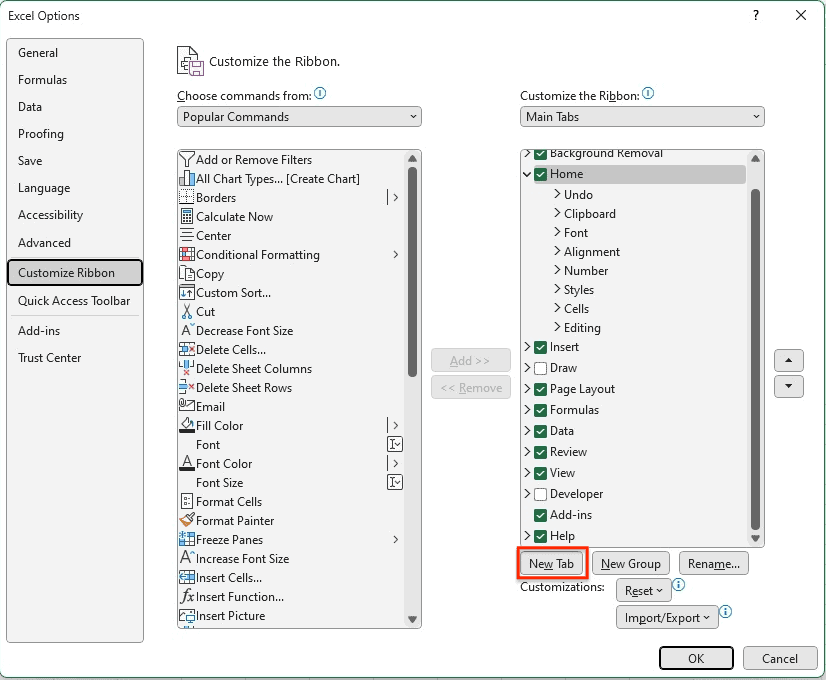
- In the Customize the Ribbon window, click on the New Tab button at the bottom of the list on the right-hand side.
- This will create a new tab on the ribbon.
- Select the new tab and click on the Rename button to give it a meaningful name.
- To add commands to the new tab, select the tab and click on the New Group button at the bottom of the list on the right-hand side.
- Select the new group and click on the Rename button to give it a meaningful name.
- Click on Choose commands from the dropdown list and select the category of commands you want to add to the new group.
- Select the commands you want to add to the new group and click on the Add button.
- The commands will now appear in the new group.
- Repeat steps 4-7 to add additional groups and commands to the custom tab.
Adding Your Own Ribbon Group
In this section, I’ll provide a step-by-step guide on how to add a ribbon group to a custom tab in Excel.
- Open Excel and go to the Customize the Ribbon screen by clicking on File > Options > Customize Ribbon or right-clicking on the ribbon and selecting Customize the Ribbon.
- Select the custom tab you want to add a group to.
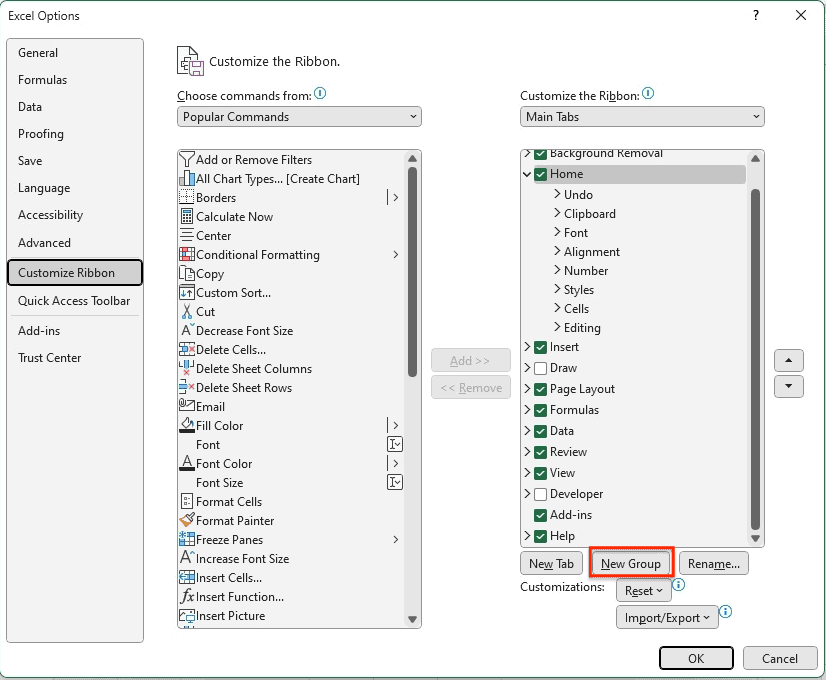
- Click on the New Group button at the bottom of the list on the right-hand side.
- This will create a new group on the custom tab.
- Select the new group and click on the Rename button to give it a meaningful name.
- To add commands to the new group, click on Choose commands from the dropdown list and select the category of commands you want to add.
- Select the commands you want to add to the new group and click on the Add button.
- The commands will now appear in the new group.
- To customize the appearance of the group, select the group and use the options under the Label, Symbol, and Layout sections.
Adding a Command Button to the Ribbon
Here are the steps to add a new group to either a default or custom tab in Excel:
- Open Excel and go to the Customize the Ribbon screen by clicking on File > Options > Customize Ribbon or right-clicking on the ribbon and selecting Customize the Ribbon.
- Select the tab and group where you want to add the command.
- Click on Choose commands from the dropdown list and select the category of commands you want to add.
- For example, if you want to add a command related to formatting, select the Home tab and then the Format category.
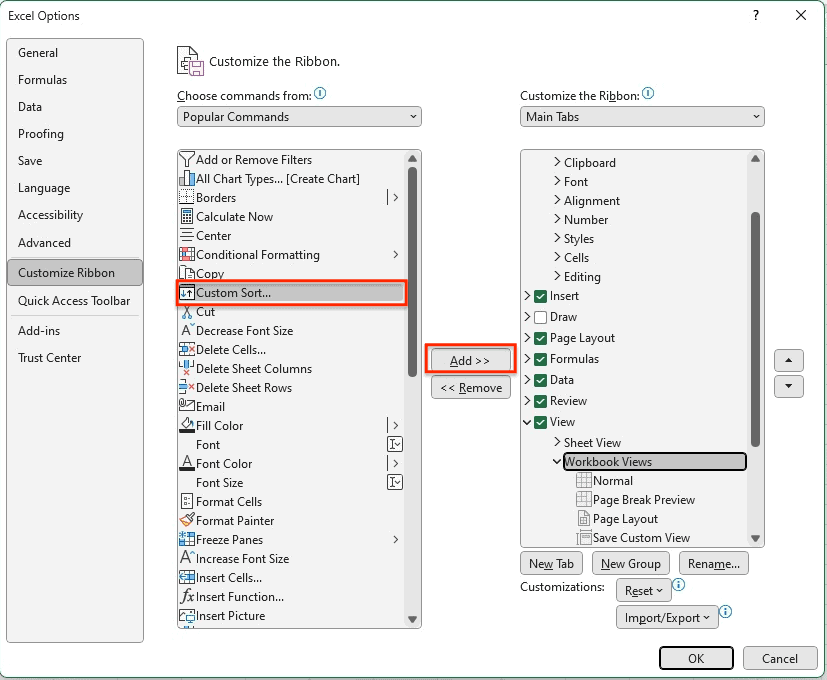
- Select the command you want to add to the ribbon section and click on the Add button.
- To customize the appearance of the command, select the command and use the options under the Label, Symbol, and Layout sections.
Hiding Command Labels and Showing Only Icons
With these step-by-step instructions, you can customize the appearance of the ribbon in Excel.
- Open Excel and go to File > Options > Customize Ribbon.
- Select the tab and group for which you want to show icons.
- In the right-hand panel, select the command for which you want to show an icon.
- Click on the Modify button.
- In the Modify Button dialog box, select the icon you want to use.
- Check the box next to Show image and text to display both the icon and text or uncheck it to show only the icon.
- Click OK to save your changes.
- Repeat steps 3-7 for any other commands for which you want to show icons.
- Click OK to close the Excel Options dialog box.
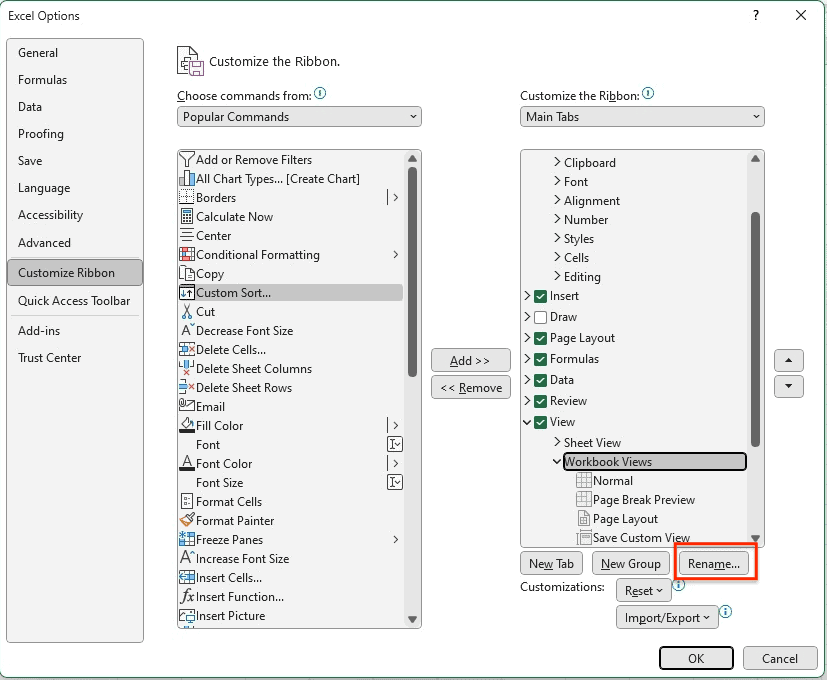
Renaming Tabs, Groups, and Commands
With these step-by-step instructions, you can customize the names of tabs, groups, and commands in Excel.
- Open Excel and go to File > Options > Customize Ribbon.
- Select the tab, group, or command that you want to rename.
- Click on the Rename button.
- In the Rename dialog box, type the new name for the tab, group, or command.
- Click OK to save your changes.
- Repeat steps 2-5 for any other tabs, groups, or commands that you want to rename.
- Click OK to close the Excel Options dialog box.
Moving Tabs, Groups, and Commands
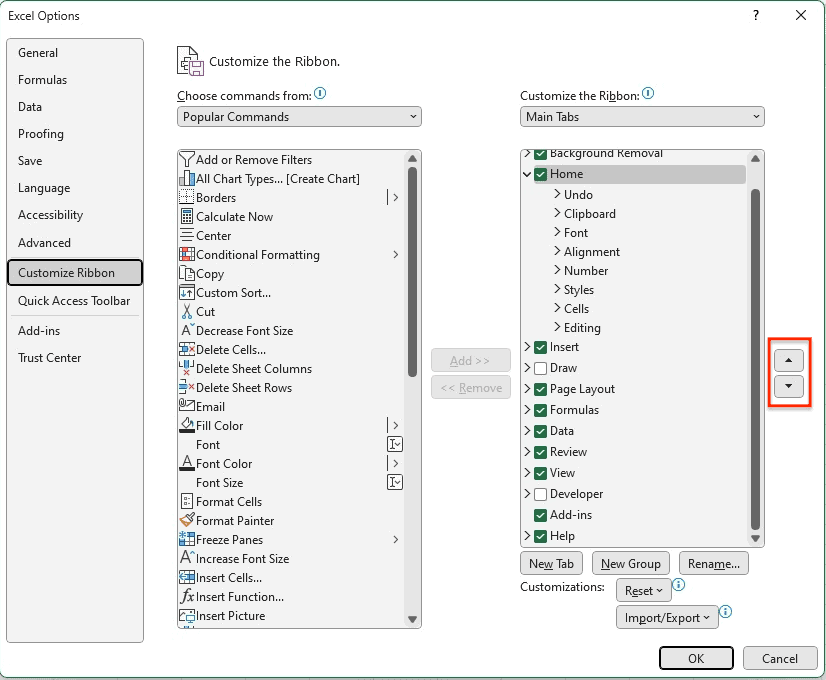
With these step-by-step instructions, you can rearrange the tabs, groups, and commands in Excel to suit your needs.
- Open Excel and go to File > Options > Customize Ribbon.
- Select the tab, group, or command that you want to move.
- Click on the Up or Down arrows to move the tab, group, or command to a new location.
- To move a group within a tab, select the group, and then use the Move Up or Move Down arrows to change its position within the tab.
- To move a command within a group, select the command, and then use the Move Up or Move Down arrows to change its position within the group.
- Repeat steps 2-5 for any other tabs, groups, or commands that you want to move.
- Click OK to save your changes and close the Excel Options dialog box.
Removing Commands, Groups, and Tabs
Here’s a step-by-step guide on how to remove elements from the ribbon in Excel.
- Open the Customize Ribbon window: Go to File > Options > Customize Ribbon, or right-click on the ribbon and select Customize the Ribbon.
- Select the tab, group, or command you want to remove: In the right pane of the Customize Ribbon window, select the tab, group, or command you want to remove.
- Click the Remove button: Once you’ve selected the element you want to remove, click the Remove button below the right pane.
- Click OK: After removing the element, click OK to close the Customize Ribbon window.

Hiding and Showing Tabs
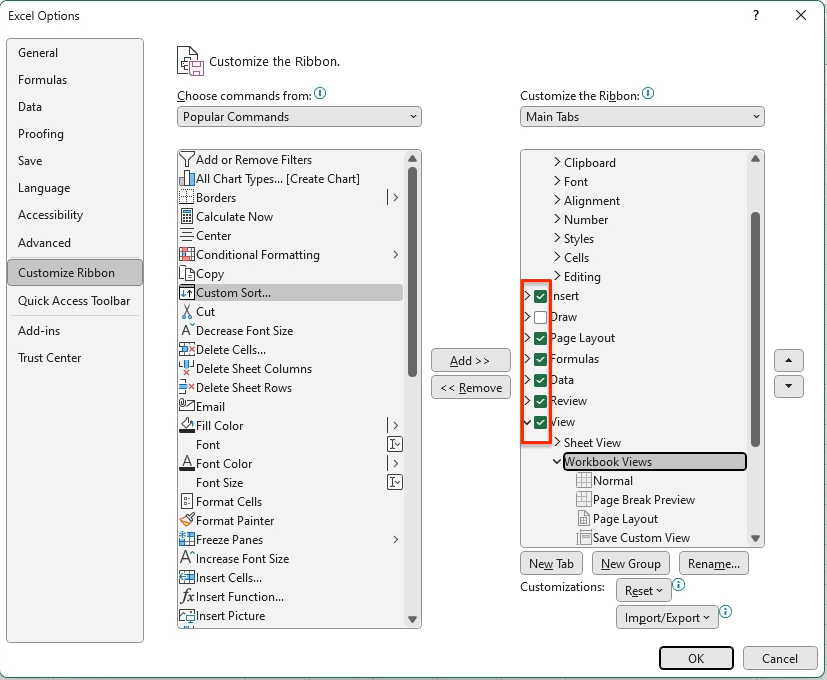
In this section, we’ll go through the steps on how to hide and show tabs on the ribbon.
- Right-click on the ribbon and select Customize the Ribbon.
- In the Excel Options window that appears, select the tab that you want to hide or show.
- To hide the tab, uncheck the box next to its name. To show the tab, check the box.
- Click OK to save your changes and close the Excel Options window.
Customizing Contextual Tabs
Customizing contextual tabs can help you access the commands you need more quickly and efficiently.
- Click on the tab that contains the contextual tab you want to customize.
- Right-click on the contextual tab and select “Customize the Ribbon” from the context menu.
- In the “Customize the Ribbon” window, select the contextual tab you want to customize from the drop-down list.
- To add a new group to the contextual tab, click the “New Group” button.
- To add a command to the new group, select the group and then click the “New Command” button.
- In the “Excel Options” window, select the command you want to add to the group from the drop-down list.
- Click “OK” to save your changes and close the “Excel Options” window.
Resetting Excel Ribbon to Default Settings
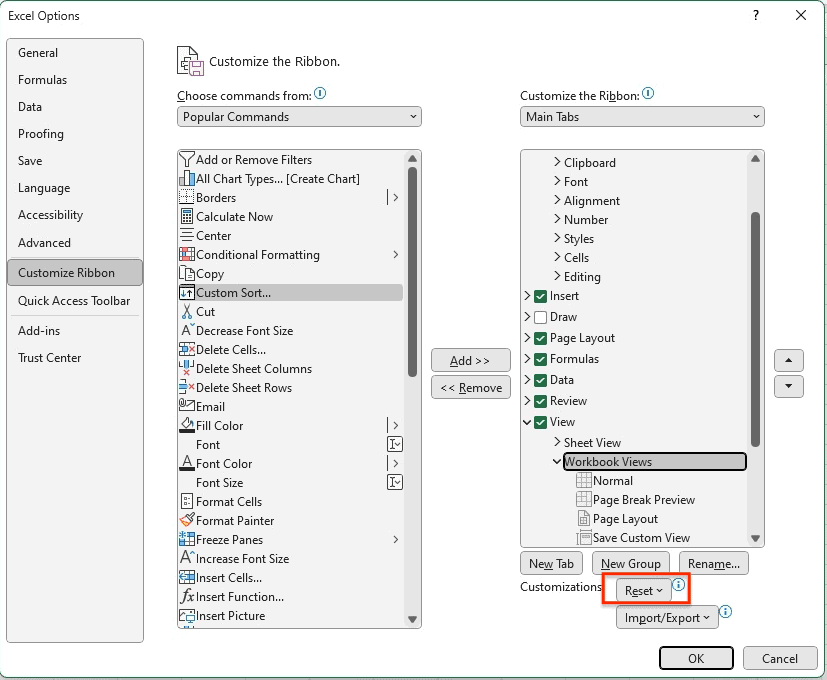
In this section, we will guide you through the steps on how to reset the Excel ribbon to its original state.
- Open Excel and click on the “File” tab.
- Select “Options” from the menu.
- Click on “Customize Ribbon” in the Excel Options window.
- Click on the “Reset” button located at the bottom of the Customize the Ribbon window.
- In the pop-up window, select the ribbon that you want to reset, either the main tabs or the quick access toolbar.
- Click on “Yes” to confirm the reset.
Exporting and Importing Customized Ribbon
In this section, we will guide you through the steps of exporting and importing a custom ribbon in Excel.
Exporting a Custom Ribbon
- Open Excel and click on the File tab.
- Click on Options and select Customize Ribbon.
- Click on the Import/Export button located at the bottom of the window.
- Select Export all customizations.
- Choose a location to save the exported file and give it a name.
- Click on the Save button.
Importing a Custom Ribbon
- Open Excel on the computer where you want to import the custom ribbon.
- Click on the File tab.
- Click on Options and select Customize Ribbon.
- Click on the Import/Export button located at the bottom of the window.
- Select Import customization file.
- Browse to the location where you saved the exported file and select it.
- Click on the Open button.
I hope this article helps you Customize the Ribbon in Excel just how you need it. Which allows you to speed up your workflow. If you are just learing to use excel or you are a pro excel user adjusting the ribbon can really help you use Excel.
