The DATE function in Excel is a powerful tool for creating date values based on the year, month, and day components provided as arguments. It allows you to perform a wide range of date calculations and can be used in combination with other Excel functions to create powerful formulas. In this blog post, we’ll explore the syntax, arguments, return value, and purpose of the DATE function. As well as some practical examples of how it can be used in everyday tasks.
DATE Function
The DATE function in Excel is used to create a date value from the year, month, and day components.
DATE Purpose
The Excel DATE function is used to create a date value based on the year, month, and day components provided as arguments.
DATE Arguments
The DATE function takes three arguments:
- year: Required. A number representing the year.
- month: Required. A number representing the month (from 1 to 12).
- day: Required. A number representing the day of the month.
DATE Return Value
The DATE function returns a serial number that represents the date. The serial number is the number of days since January 1, 1900 (for dates on or after January 1, 1900) or 1-Jan-1904 (for dates on or after January 1, 1904), depending on the workbook’s date system.
DATE Syntax
=DATE(year, month, day)DATE Syntax Explained
- year is a number representing the year (e.g., 2023).
- month is a number representing the month, from 1 (January) to 12 (December).
- day is a number representing the day of the month, from 1 to 31, depending on the month and year.
The DATE function returns a serial number, which represents the date.
You can format this serial number as a date using Excel’s formatting tools.
For example, to create a date value for March 6, 2023, you would use the following formula:
=DATE(2023, 3, 6)This would return the serial number 44379, which represents the date March 6, 2023.
You can then format this serial number as a date using the Format Cells dialog box or the Home tab’s Number group.
DATE Function Usage
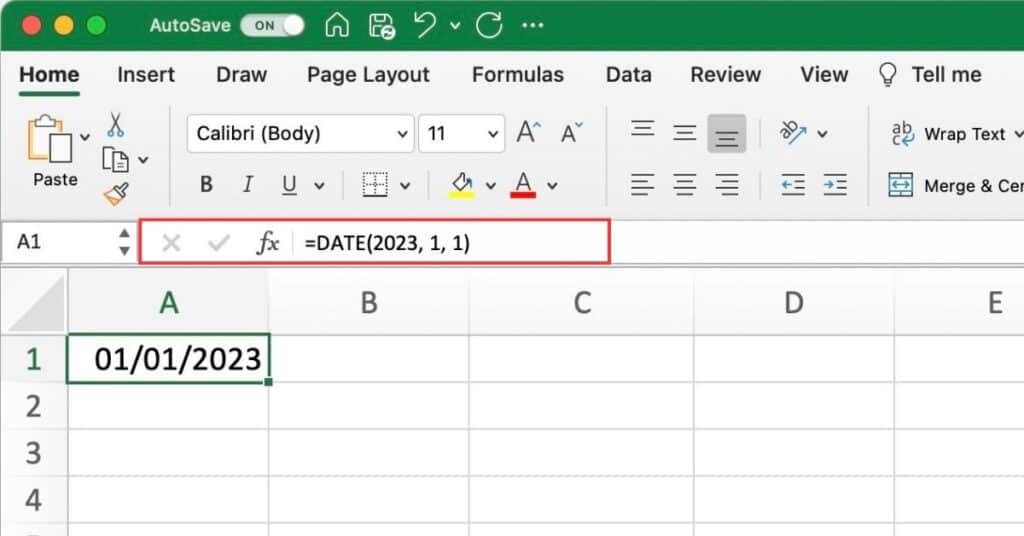
Let’s say we want to create a date value for January 1, 2023. We can use the DATE function to do this by entering the following formula into a cell in Excel:
=DATE(2023, 1, 1)
This formula uses the hard-coded numbers 2023, 1, and 1 to represent the year, month, and day components of the date, respectively.
When we enter this formula into a cell, Excel will calculate the serial number that represents this date (in this case, 44296), which can be formatted as a date using Excel’s formatting tools.
DATE Using Cell Reference
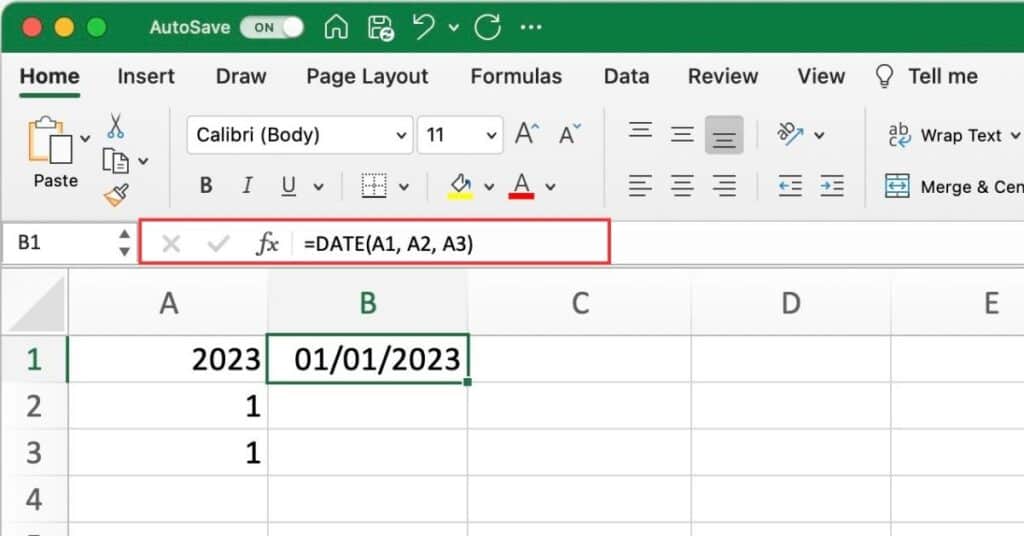
We could also use variables or cell references to represent the year, month, and day components. Instead of hard-coding the numbers directly into the formula.
For example, if we had the year, month, and day stored in cells A1, A2, and A3, respectively, we could create a date value using the following formula:
=DATE(A1, A2, A3)
This would create a date value based on the values in cells A1, A2, and A3, rather than hard-coding the numbers directly into the formula.
DATE With SUMIFS, COUNTIFS
Here’s an example of how the DATE function can be used in conjunction with SUMIFS and COUNTIFS functions to perform date-based calculations.
DATE With SUMIFS
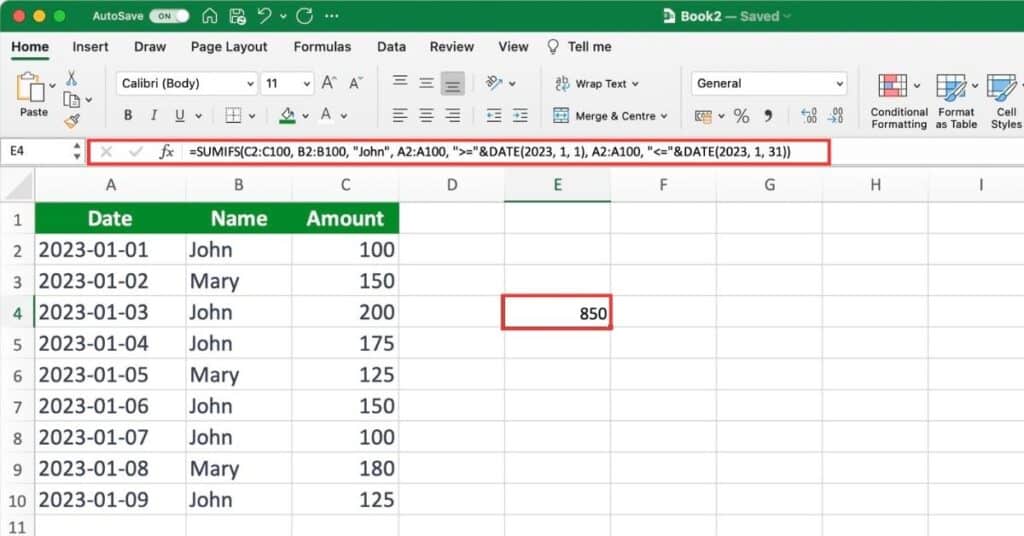
Let’s say we have a table of sales data that includes columns for the date of each sale.
The salesperson who made the sale, and the amount of the sale.
We want to calculate the total sales and number of sales made by a specific salesperson for a given month and year.
To do this, we can use the SUMIFS and COUNTIFS functions in combination with the DATE function.
Here’s an example formula that would calculate the total sales made by “John” in January 2023:
=SUMIFS(C2:C100, B2:B100, "John", A2:A100, ">="&DATE(2023, 1, 1), A2:A100, "<="&DATE(2023, 1, 31))
DATE With SUMIFS Explained
Here’s how the formula works:
- C2:C100 refers to the range of cells where the “Amount” values are stored.
- B2:B100 refers to the range of cells where the “Name” values are stored. “John” is the criteria we want to match in the “Name” column.
- A2:A100 refers to the range of cells where the “Date” values are stored.
- “>=”&DATE(2023, 1, 1) specifies that we want to include all dates on or after 1/1/2023.
- “<=”&DATE(2023, 1, 31) specifies that we want to include all dates on or before 1/31/2023.
Using the formula, the function will sum up all the values in the “Amount” column where the corresponding row meets all three criteria (Name is “John”, date is on or after 1/1/2023, and date is on or before 1/31/2023).
=SUMIFS(C2:C100, B2:B100, "John", A2:A100, ">="&DATE(2023, 1, 1), A2:A100, "<="&DATE(2023, 1, 31)) =100 + 200 + 175 + 150 + 100 + 125 =850So, the total amount of John’s sales between 1/1/2023 and 1/31/2023 is 850.
DATE With COUNTIFS
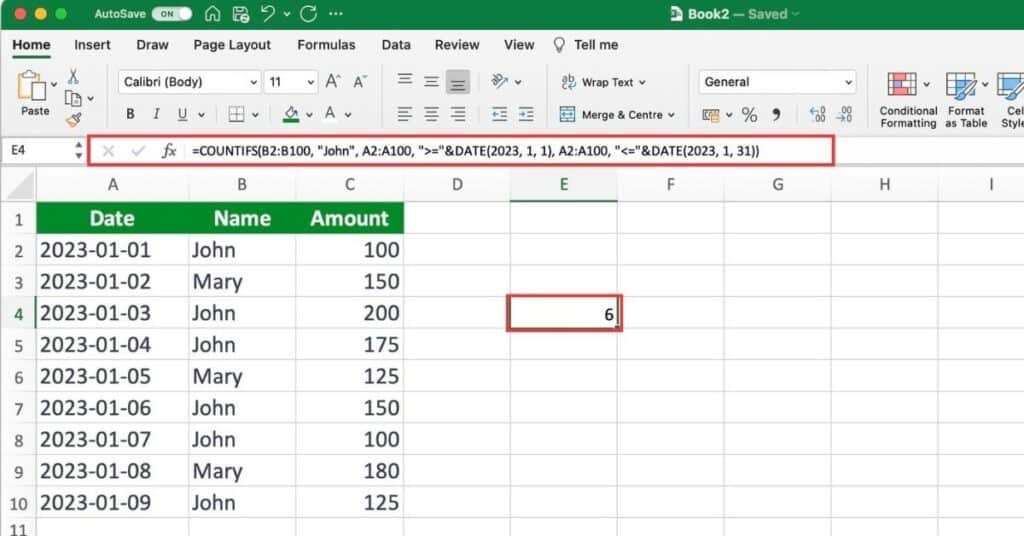
Similarly, we could use the COUNTIFS function to count the number of sales made by “John” in January 2023, using the following formula:
=COUNTIFS(B2:B100, "John", A2:A100, ">="&DATE(2023, 1, 1), A2:A100, "<="&DATE(2023, 1, 31))
DATE With COUNTIFS Explained
Here’s how the formula works:
- B2:B100 refers to the range of cells where the “Name” values are stored. “John” is the criteria we want to match in the “Name” column.
- A2:A100 refers to the range of cells where the “Date” values are stored.
- “>=”&DATE(2023, 1, 1) specifies that we want to include all dates on or after 1/1/2023.
- “<=”&DATE(2023, 1, 31) specifies that we want to include all dates on or before 1/31/2023.
Using the formula, the function will count all the values in the “Name” column where the corresponding row meets all three criteria (Name is “John”, date is on or after 1/1/2023, and date is on or before 1/31/2023).
Therefore, the result of the formula will be:
=COUNTIFS(B2:B100, "John", A2:A100, ">="&DATE(2023, 1, 1), A2:A100, "<="&DATE(2023, 1, 31)) =6So, John made a total of 6 sales between 1/1/2023 and 1/31/2023.
This formula uses the same criteria as the SUMIFS formula. But uses the COUNTIFS function to count the number of rows that meet the specified criteria.
By using the DATE function in conjunction with the SUMIFS and COUNTIFS functions. We can easily perform date-based calculations on large sets of data in Excel.
It’s important to note that the DATE function assumes that the input values are valid, and will return a #VALUE! error. If any of the arguments are not valid (e.g., a non-numeric value, a month or day number outside of the valid range).
You can also use the DATE function in combination with other Excel functions to perform date calculations. Such as finding the difference between two dates or adding a certain number of days to a date.
